Skip to content

Networking

[Actualizado a 26 de agosto de 2026]

GNU/Linux

Segunda IP

# Añadimos alias de interfaz
sudo ip link add $ALIAS_DEV link "$DEV" type macvlan mode bridge

# Asignamos IP a la nueva interfaz
sudo ip a add "$IP/$CIDR" dev $ALIAS_DEV

# La levantamos
sudo ip link set $ALIAS_DEV up

# Mostramos el resultado
ip a show $ALIAS_DEV

# Eliminar IP
sudo ip a del "$IP/$CIDR" dev $ALIAS_DEV

Donde: - ALIAS_DEV: nombre del alias. Aparecerá como ALIAS_DEV@DEV - DEV: el dispositivo (eth0, enp3s1, wlan0, ...) - IP: la ip que le asignamos (estática). - CIDR: el tamaño de la subred. Es opcional, pero si no estaremos creando una interfaz de loopback (/32).

Ponemos el $ delante para que podamos asignar los valores a variables y luego copiar/pegar la parte del script que nos interese (todo menos lo de eliminar).

Rutas

# Ver rutas
ip r 

# Añadir ruta
sudo ip r add $IP/$CIDR via $GATEWAY_IP
sudo ip r add $IP/$CIDR dev $DEV

# Añadir default
sudo ip r add default $IP/$CIDR via $GATEWAY_IP
sudo ip r add default $IP/$CIDR dev $DEV

# Cambiar la métrica (para realizar rutas de backup)
sudo ip route replace [destination] via [gateway] dev [interface] metric [value]

Recuerda que el equipo siempre tomará la ruta con menor métrica en caso de haber varias por lo que si tenemos 2 conexiones, podemos realizar una ruta de backup poniendo una métrica superior a la por defecto.

MAC

NIC="eno1" ## <-- My NIC name ##
ip link show $NIC
ip link set dev $NIC down

## set new MAC address ##
ip link set dev $NIC address XX:YY:ZZ:AA:BB:CC
ip link set dev $NIC up

bridge

Vamos a realizar el proceso en 2 etapas:

  1. Crearemos un bridge temporal con ip-link y verificaremos que todo está correcto.
  2. Lo consolidaremos creando el bridge con netplan o systemd-networkd.

Para saber si tenemos que usar netplan o systemd utilizaremos los comandos sudo netplan status y networkctl status.

Revisa bien los pasos y nombres ya que vas a "atrapar" la interfaz de red con el bridge, por lo que te quedarás sin acceso a internet en el host sin NO realizas los 4 puntos correctamente.

# 0. Ver interfaces disponibles (tomar la que tenga una IP del rango del aula)
ip a

# 1. Crear el bridge
sudo ip link add name br0 type bridge

# 2. Añadir tu interfaz física al bridge (ejemplo: enp3s0)
sudo ip link set enp3s0 master br0

# 3. Levantar el bridge
sudo ip link set br0 up

# 4. Pedir IP al router para el bridge
sudo dhclient br0

... o sólo con comunicación interna (sin salida a internet):

# 1. Crear el dispositivo bridge llamado 'br-interno'
sudo ip link add name br-interno type bridge

# 2. Levantar la interfaz
sudo ip link set br-interno up

# 3. (Opcional) Asignarle una IP al bridge para que el host pueda hablar con los contenedores
sudo ip addr add 10.20.30.1/24 dev br-interno

Esta segunda opción podemos realizarla de forma automática desde el panel WebUI de Incus.

2a. bridge con netplan

En Ubuntu, la única forma de que esto sobreviva a un reinicio es editando los archivos en /etc/netplan/.

Supongamos que tu interfaz física se llama enp3s0 y quieres que el bridge br0 obtenga IP automáticamente de tu router.

a) Identificar la configuración actual

Identifica tu configuración actual Mira qué archivo tienes: ls /etc/netplan/. Normalmente es algo como 01-netcfg.yaml, 01-network-manager-all.yaml o 50-cloud-init.yaml.

b) Realizar copia de seguridad y editar

Edita el archivo Haz una copia de seguridad primero: sudo cp /etc/netplan/01-netcfg.yaml /etc/netplan/01-netcfg.yaml.bak.

Luego edita el archivo (sudo nano /etc/netplan/01-netcfg.yaml) así:

network:
  version: 2
  renderer: networkd
  ethernets:
    enp3s0:
      dhcp4: no
      dhcp6: no
  bridges:
    br0:
      interfaces: [enp3s0]
      dhcp4: yes
      parameters:
        stp: true
        forward-delay: 0

¿Qué hemos hecho aquí?

  • ethernets -> enp3s0 -> dhcp4: no: Le decimos a la tarjeta física que ya no intente buscar una IP por sí misma.
  • bridges -> br0: Creamos el bridge.
  • interfaces: [enp3s0]: "Enchufamos" la tarjeta física al bridge.
  • dhcp4: yes: Ahora es el bridge quien le pide la IP al router.
c) Aplicar con try

Aplicar con seguridad ¡MUY IMPORTANTE! No uses netplan apply directamente si estás por SSH, porque si hay un error, perderás el acceso y no podrás arreglarlo. Usa:

sudo netplan try

Este comando aplicará la configuración, pero si no presionas "ENTER" en 120 segundos para confirmar, el sistema hará un rollback automático a la configuración anterior. Es el "salvavidas" para no quedar bloqueado.

2b. brige con systemd-networkd

Si usas systemd-networkd en lugar de Netplan, estás trabajando a un nivel más "puro" y manual, lo cual es muy común en servidores minimalistas o distribuciones basadas en systemd (como las versiones más ligeras de Ubuntu Server o Debian).

En systemd-networkd, la configuración se divide en archivos .network (para definir la lógica de las interfaces) y .netdev (para definir la creación del dispositivo virtual, como el bridge).

Aquí tienes cómo configurar el perfil Bridge (modo directo al router) de forma permanente. Crearemos un dispositivo br0 que contenga a enp3s0 y que solicite IP por DHCP.

a) Crear el dispositivo virtual (.netdev)

Primero debemos decirle al kernel que cree un "objeto" tipo bridge.

Crea el archivo: sudo nano /etc/systemd/network/20-br0.netdev

[NetDev]
Name=br0
Kind=bridge

[Bridge]
# Esto activa el Spanning Tree Protocol para evitar bucles de red
STP=true
b) Configurar la interfaz física (.network)

Ahora le decimos a la interfaz física (enp3s0) que no busque IP, sino que se convierta en un "esclavo" del bridge.

Crea el archivo: sudo nano /etc/systemd/network/25-enp3s0.network

[Match]
Name=enp3s0

[Network]
# Le decimos que sea parte de un bridge
Bridge=br0
c) Configurar el Bridge para que reciba IP (.network)

Ahora configuramos el propio br0 para que actúe como la interfaz principal y pida una IP al router.

Crea el archivo: sudo nano/etc/systemd/network/30-br0.network

[Match]
Name=br0

[Network]
# Pedir IP automáticamente
DHCP=yes
d) Aplicar los cambios

Una vez creados los archivos, reiniciamos el servicio para que lea la nueva estructura.

Cuidado: aquí no hay salvavidas como con netplan, revisa las configuraciones antes de aplicarlas.

sudo systemctl restart systemd-networkd

Windows

CMD

Netsh int ipv4 add address name="Local Area Connection" 192.168.1.92 255.255.255.0 SkipAsSource=True

List all assigned IP addresses and their SkipAsSource values:

netsh int ipv4 show ipaddresses level=verbose

PowerShell

New-NetIPAddress –IPAddress 192.168.1.92 –PrefixLength 24 –InterfaceAlias Ethernet0 –SkipAsSource $True

To allow outgoing traffic from a specific NIC IP address, change SkipAsSource to False.

Get-NetIPAddress 192.168.1.92 | Set-NetIPAddress -SkipAsSource $False

NOTA: En windows NO hay una IP principal por lo que si queremos que todas las salidas se hagan desde una, deberemos marcar ésta como -SkipAsSource $FALSE y el resto a $TRUE.

Remove the additional IP address:

Get-NetIPAddress 192.168.1.92| Remove-NetIPAddress

Gráfico

Assigning an Additional IP Address to a Network Adapter on Windows

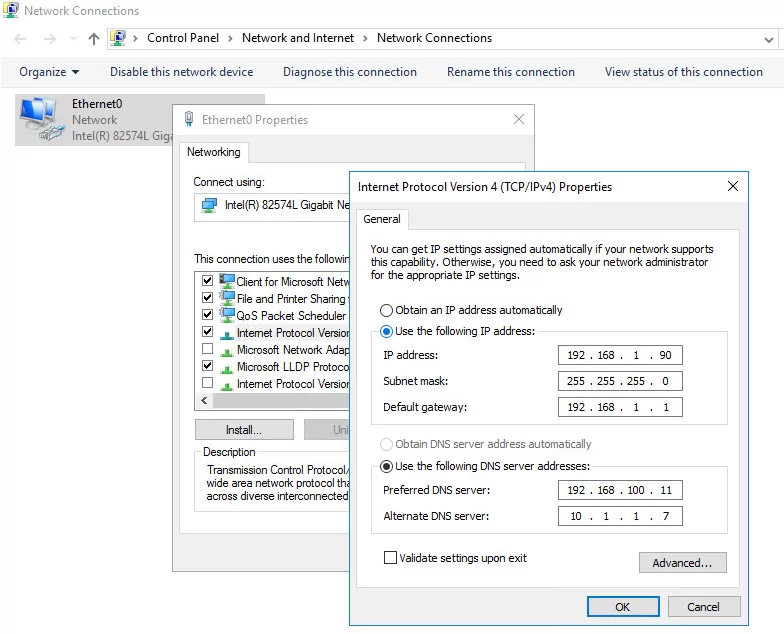
The Control Panel GUI can be used to add an additional IP address to the network adapter.

  1. Navigate to the Control Panel –> Network and Internet –> Network and Sharing Center -> Change adapter settings (or just run the ncpa.cpl command);
  2. Open the network interface properties;
  3. Select TCP/IP v4 from the list of protocols and click Propertiestcp-ip properties windows 10
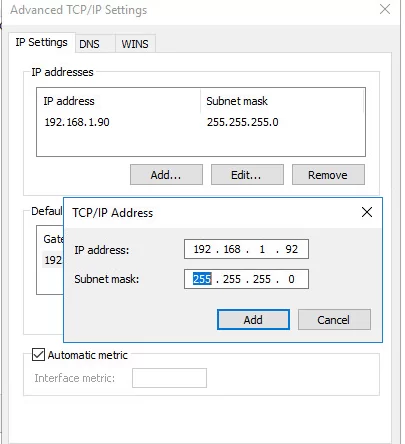
  4. Click the Advanced button and then click Add in the IP Addresses section;
  5. Specify an additional IP address, subnet mask, and click Add;
  6. Save the changes. Assigning multiple IP addresses to single NIC in Windows 10

Rutas

# Añadir ruta
route ADD 0.0.0.0 MASK 0.0.0.0  192.168.76.2 IF 11

# O con métrica
route ADD 0.0.0.0 MASK 0.0.0.0  192.168.76.2 METRIC 3 IF 11

# Consultar rutas
route print

bridge

GUI

eso

Con netsh

The netsh bridge command configures network adapter bridge settings in Windows. By creating a network bridge, you can link two or more network segments, allowing devices on separate segments to communicate seamlessly as if they're part of a single network.

# Opciones:
# netsh bridge [add | create | destroy | dump | help | list | remove | set | show | ?]

# 1. Crear:
netsh bridge create [<Adapter ID #1> <Adapter ID #2>]

# 2. Añadir interfaces:
netsh bridge add <Adapter ID> to <Bridge GUID>

# 3. Listar:
netsh bridge list

# 4. Borrar interfaces:
netsh bridge remove <Adapter ID> from <Bridge GUID>

# ... o todas:
netsh bridge remove all from <Bridge GUID>

# 5. Modificar conf de interfaces:
netsh bridge set adapter [id=]<integer> [[forcecompatmode=]enable|disable]

# 6. Mostrar configuración:
netsh bridge show adapter

# 9. Eliminar puente:
netsh bridge destroy <Bridge GUID>
Parameters
Command Description
bridge add Adds a network adapter, specified by its Adapter ID, to an existing bridge identified by its Bridge GUID.
bridge create Creates a new network bridge that includes two specified network adapters. The newly created bridge is assigned its own unique GUID, which can be retrieved using the netsh bridge list command.
bridge destroy Removes all network adapters from the specified bridge, identified by its bridge GUID, and deletes the bridge.
bridge dump Creates a script containing the current context configuration. The script can be saved to a file and used to restore settings if they're altered or need to be replicated on another system.
bridge list Displays all the created bridges that are uniquely identified by the bridge GUID.
bridge remove Removes a network adapter, specified by its Adapter ID, from a bridge identified by its Bridge GUID. Using the all parameter removes all network adapters from the specified bridge and deletes the bridge.
bridge set adapter Modifies the bridge configuration for the specified adapter. id - The identifier of the network adapter to configure. To view available adapter IDs, use the netsh bridge show adapter command. forcecompatmode - Specifies whether to enable or disable Layer 3 compatibility mode for the adapter: enable: Turns on Layer 3 mode. disable: Turns off Layer 3 mode.
bridge show adapter Displays a list of all available network adapters, including their Adapter IDs, current settings, and status flags, indicating which adapters can participate in a network bridge.
help or ? Displays a list of commands and their descriptions in the current context.

Fuente: learn.microsoft.com